Map authors build their maps to include the layers and configurations needed to achieve the purpose of the map. When one of the purposes of a map is to gather community or organizational input, the map author includes editable feature layers in the map. For example, an author might include an editable feature layer that allows the birding community to post their bird sightings directly on the map and attach media files—such as photographs, audio files, and video files—to the specific observation points. Because these features are part of the layer, any changes made to the layer in the map are immediately viewable by everybody who has access to the layer, even when the layer is part of a different map.
The owner of the feature layer or the administrator in your organization decides whether a feature layer is editable and sets an editing level. Editing levels determine whether you can add features, delete features, update feature attributes only, or update feature geometry.
Tip:
You can use keyboard shortcuts to quickly complete common workflows in Map Viewer. To view the full list of keyboard shortcuts in Map Viewer, press Alt+? on Microsoft Windows or Option+? on Mac.
You can open the Editor pane described in the sections below from feature pop-ups in Map Viewer.
Add features
When you add a feature, you draw or place the feature on the map and add attribute values.
Open the editable hosted feature layer, hosted feature layer view, or ArcGIS Server feature layer in Map Viewer and do the following to add a feature to the map and populate its attributes:
- In Map Viewer, open the map containing the layer or add the layer directly.
- Pan and zoom to the location on the map where you need to add the feature.
- Click Edit
 on the Settings (light) toolbar.
The Editor pane appears. The available editing options depend on the editing options that are set on the feature layer.
- To enable feature snapping, click Snapping, switch on the Enable snapping toggle button, and enable or disable the following snapping options:
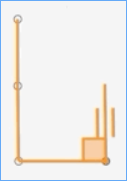
- Geometry guides—When you enable this option, Map Viewer displays visual cues to help you identify when you're drawing lines that are perpendicular or parallel to other lines in the feature.
In the image below, a square appears where two lines of the polygon are perpendicular to one another, and small lines appear on either side of the line that is being drawn parallel to another line in the polygon.

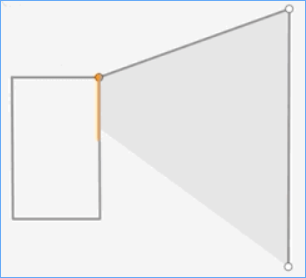
- Feature to feature—When you enable this option, the vertices of the feature you draw will snap to the vertex, edge, or endpoint of an existing feature.
In the example below, the editor draws the larger feature so that the vertex and edge of the new feature snaps to coincide with the vertex and edge of an existing rectangular feature.

- Geometry guides—When you enable this option, Map Viewer displays visual cues to help you identify when you're drawing lines that are perpendicular or parallel to other lines in the feature.
- In the Snapping layers section of the Snapping Settings pop-up, click the names of the feature layers for which snapping will be enabled.
- Click the Snapping button again to close the Snapping Settings pop-up.
- In the Create features section of the Editor pane, click the type of feature to add.
- Draw the feature on the map.
- To add a point, click a location on the map.
- To add a line, click the line's starting location on the map. The drawing tool continues with a straight line until you click a new location. When you need the line to curve or change directions, click the map in those locations to add a node. When you get to the end of the new line, double-click that location on the map to complete the drawing.
- To draw a polygon, click the polygon's starting location on the map. To create the correct shape for the polygon, click the map locations where you want the polygon outline to change directions. Continue clicking locations to create the correct polygon shape. When you reach the starting point, double-click to close the polygon and complete the drawing.
Each time you add a feature to the map, the attributes for the feature appear in the Create features pane.
- Type or choose values for each attribute. When you finish providing attribute values, click Create.
In the Create features pane, fields that require a value are outlined in pink. In a form, fields that require a value have an asterisk (*) next to the field label. You must provide values for those attributes before you click Create.
You must click Create to add the feature. If you close the Create features pane without clicking Create, you'll be prompted to discard your edits.
- Click the back arrow next to Place feature when you finish adding features.
Delete features
If a feature is no longer valid—it may have been added in error or the feature it represents in the real world no longer exists—you can delete it from the feature layer.
Caution:
This action deletes the feature geometry and its attributes and cannot be undone.Open the editable hosted feature layer, hosted feature layer view, or ArcGIS Server feature layer in Map Viewer and do the following to delete a feature:
- In Map Viewer, open the map containing the layer or add the layer directly.
- Click Edit
 on the Settings (light) toolbar.
The Editor pane appears. The available editing options depend on the editing options that are set on the feature layer.
- Click Select under Edit features in the Editor pane.
- Select the feature on the map.
- If there is more than one feature in that location, you must choose the correct layer from the list in the Editor pane.
The feature you choose is highlighted on the map.
- Click Delete to delete a feature.
- To confirm you want to permanently delete the feature and its attributes, click Delete again or, if you do not want to delete this feature, click Keep feature.
Update feature attributes
You can change nonspatial attribute values for existing features by selecting a feature and typing or choosing new values for the fields associated with the feature.
Open the editable hosted feature layer, hosted feature layer view, or ArcGIS Server feature layer in Map Viewer and do the following to update the attributes of an existing feature:
- In Map Viewer, open the map containing the layer or add the layer directly.
- Click Edit
 on the Settings (light) toolbar.
The Editor pane appears. The available editing options depend on the editing options that are set on the feature layer.
- To enable feature snapping, click Snapping, switch on the Enable snapping toggle button, and enable or disable the following snapping options:
- Geometry guides—When you enable this option, Map Viewer displays visual cues to help you identify when you've moved lines in an existing feature so that they are perpendicular or parallel to other lines in the feature.
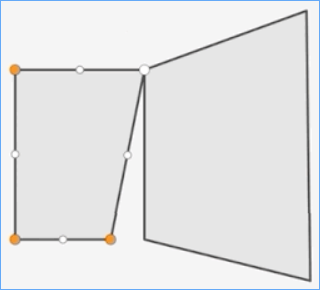
- Feature to feature—When you enable this option, the vertices of the feature you edit will snap to the vertex, edge, or endpoint of another feature.
In this example, the editor drags the vertex of one existing feature to snap to a vertex of another existing feature.

- In the Snapping layers section of the Snapping Settings pop-up, click the names of the feature layers for which snapping will be enabled.
- Click the Snapping button again to close the Snapping Settings pop-up.
- Click Select under Edit features in the Editor pane.
- Select the feature on the map.
- If there is more than one feature in that location, you must choose the correct layer from the list in the Editor pane.
The feature you choose is highlighted on the map.
- Choose new attribute values or, for text fields, click in the attribute field to type a new value. Press the Tab key when you finish typing.
- Click Update when you finish changing attribute values for this feature.
Update feature geometry
You can change the location of a feature or, for line and polygon features, you can change the feature's shape.
Open the editable hosted feature layer, hosted feature layer view, or ArcGIS Server feature layer in Map Viewer and do the following to update a feature's geometry:
- In Map Viewer, open the map containing the layer or add the layer directly.
- Click Edit
 on the Settings (light) toolbar.
The Editor pane appears. The available editing options depend on the editing options that are set on the feature layer.
- Click Select under Edit features in the Editor pane.
- Select the feature on the map.
- If there is more than one feature in that location, you must choose the correct layer from the list in the Editor pane.
The feature you choose is highlighted on the map.
- To move the selected feature, drag it to a new location on the map, and click Update.
- To change the shape of a line or polygon feature, click the feature again to draw the feature's nodes, and do the following:
- Drag a node to a new location to reshape the geometry.
- New nodes are added if you drag an existing node far enough to require more nodes. You can drag the new nodes to refine the geometry's shape.
- Click Update when you finish reshaping the geometry to the shape that you require.
Add related photos and files
Feature layers can include related photos or other files as attachments. If the layer owner has enabled attachments on the layer and you have privileges to edit the layer, you can attach related photos and files to records in the table.
Add related files to a feature layer
Follow these steps to add related photos and files as attachments to a feature layer:
- In Map Viewer, open the map containing the layer or add the layer directly.
- Click Edit
 on the Settings (light) toolbar.
The Editor pane appears. The available editing options depend on the editing options that are set on the feature layer.
- Click Select under Edit features in the Editor pane.
- Select the feature on the map to which you want to attach a photo or other file.
- If there is more than one feature in that location, you must choose the correct layer from the list in the Editor pane.
The feature you choose is highlighted on the map.
- Scroll down to the Attachments section and click Add.
- Click Select file, browse to the file you want to attach, and click Open.
- Click Add.
Supported attachment formats
The following file formats are supported as attachments:
7Z, AIF, AVI, BMP, CSV, DOC, DOCX, DOT, ECW, EMF, EPS, GEOJSON, GIF, GML, GTAR, GZ, IMG, J2K, JP2, JPC, JPE, JPEG, JPF, JPG, JSON, M4A, MDB, MID, MOV, MP2, MP3, MP4, MPA, MPE, MPEG, MPG, MPV2, PDF, PNG, PPT, PPTX, PS, PSD, QT, RA, RAM, RAW, RMI, SID, TAR, TGZ, TIF, TIFF, TXT, VRML, WAV, WMA, WMF, WMV, WPS, XLS, XLSX, XLT, XML, and ZIP.